Your Very Own OSM!
Creating a Local OSM Extract
osm2pgsql and osmium to create a regional extract of OpenStreetMap
Overview
This guide was written to accompany an in-person workshop which includes the related OSM extract presentation. Users completing this guide are assumed to have basic familiarity with OpenStreetMap data.
Goals
By the end of this guide, you should have a database with a few OpenStreetMap layers in it for the area you’re intersted in.
More than that, you should have a basic understanding of how the component parts of the process work, and how to extend this to meet your own particular needs or interests.
Associated Repo
Much of the information, configuration files, and commands in this workshop can be found in the associated jcarlson/osm-extract-workshop repo on Codeberg. You won’t necessarily need it, but you may find it useful for quickly copying Lua files and terminal commands.
Requirements
Data
- A Geofabrik extract of your choice, in the
*.osm.pbfformat - A geoJSON file representing your area of interest
Software
Optional
QGIS isn’t really required to complete the workshop, but it’s not going to be much fun if you can’t see and work with your data.
Another option is to connect to your database with pgAdmin, where you can at least query the tables and preview the spatial component. If you’re using the workshop container (see next section), pgAdmin is part of the compose file. Sign in with the email gis@example.com, password gis.
Previously, this workshop material covered the use of imposm. I decided to cut that from the workshop in 2024 in order to focus more on osm2pgsql, which I consider more robust and adaptable. I’d rather the workshop be a deeper dive on one tool than a shallow introduction to both.
Software Alternatives: Docker / Podman
Maybe you can’t / don’t want to install all that on your machine. No worries! Using a container system like Docker or Podman, you can run everything in its own space, and you can easily trash it all when you’re done.
Whether you use Docker or Podman or something else entirely is up to you. This workshop has been tested in the two named options and works well in both. We’ll refer to “Docker” for convenience, but if you’re on Podman, more power to ya.
Run Your Own Containers
A simple option here is to use a pre-built Docker image with osm2pgsql and osmium already set up for you. If you want access to the latest versions of things, there is a Dockerfile in the workshop repo. Its built counterpart is on Docker Hub.
Getting the image is as simple as:
docker pull jdcarls2/osm-extract-workshop:foss4gna2024You can also use a container to create your PostgreSQL / PostGIS database, regardless of where the other tools are installed. This is especially useful for trying out the process without affecting the rest of your system.
Isaac Boates’ Docker Images
Credit where it’s due: the image I’ve put on Docker Hub is adapted from Isaac Boates’ incredibly useful osm-utilities-docker repo.
The key difference with those Docker images is that the containers use osm2pgsql and osmium as their entrypoints. That means that running the container is the same as running those commands.
It’s a convenient feature, but in practice, it means that the terminal commands you’ll use to interact with them are specific to that image. For the workshop, I wanted to show commands that would work the same in or out of Docker. Rather than running a command and exiting, the the workshop image will stay on and wait for user input.
docker run iboates/osm2pgsql:latest [args] == osm2pgsql [args]Compose File
If you want to get your environment running with the right OSM tools as well a PostGIS database all in one go, consider using a compose file. Here’s a simple example:
docker-compose.yml
version: '3'
services:
database:
image: 'postgis/postgis:latest'
ports:
- 55432:5432
environment:
POSTGRES_USER: gis
POSTGRES_PASSWORD: gis
POSTGRES_DB: osm
networks:
- osm
osm:
image: 'jdcarls2/osm-extract-workshop:foss4gna2024'
volumes:
- ./app:/app
tty: true
networks:
- osm
volumes:
db-data:
networks:
osm:
driver: bridge- 1
- Maps the default postgres port (5432) to our machine’s port 55432. This makes our DB available outside of the Docker image.
- 2
-
Anything in the local
appdirectory will be available in the osm-tools image in a folder of the same name. This is how we can easily pass data files in and out. - 3
- Keeps the image alive so that we can access an interactive terminal
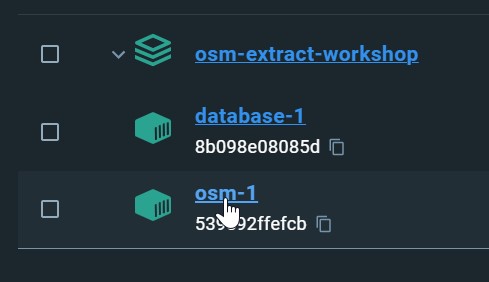
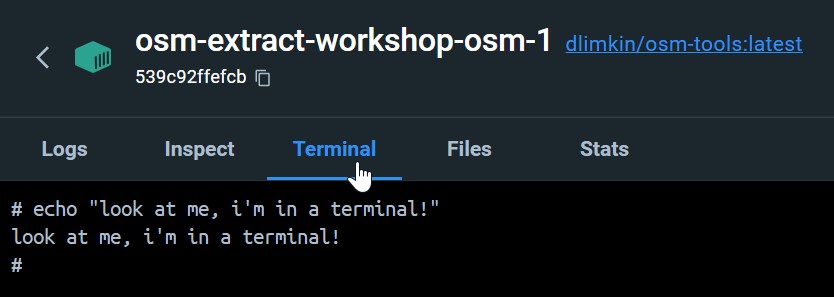
Sending Commands to your Docker Image
GUI
In Docker Desktop, it’s quite easy. Click on the osm container, then switch to the terminal tab.
CLI
Once your container is running, all you need is the command docker attach [container-name]. Your terminal will be “attached” to that instance, letting you send terminal commands to it.
Create a geographic subset: osmium
Osmium is a veritable Swiss Army knife for working with OpenStreetMap data. It does all sorts of things, like:
- extracting geographic subsets
- getting metadata about objects
- extracting data by attributes
- generating and applying change files
For our purposes, it’s the geographic subset we’re interested in.
- 1
- Our area of intest
- 2
- The Geofabrik file
- 3
- The new output
- 4
- The extract strategy for features that cross our AOI boundary.
You might not need this if you’re working with the entire Geofabrik extract, like an entire state or region. But if you’re working with a geographic subset, trimming it down with osmium ahead of our import steps will speed things up a lot.
After running the above command, you ought to have a smaller .osm.pbf file created.

Extract a subset of your data file. Compare file sizes - the extract should be smaller than the original file.
Optionally, run osmium fileinfo your-extract-file.osm.pbf to see information about it. Compare with the output of the same command against the original file.
Your AOI spans two (or more) files!
Suppose you’re trying to create a geographic subset for an area that spans multiple Geofabrik files. It would be pretty inefficient to download the entire region or country just to get a little bit of the data over that line.
So, what do we do?
Just download both extracts and use osmium extract on both of them, keeping their names distinct. Then use osmium merge!
osmium extract -p city.geojson /app/data/illinois-latest.osm.pbf \
  -o /app/data/1.osm.pbf --overwrite \
  -s smart -S types=any

osmium extract -p city.geojson /app/data/missouri-latest.osm.pbf \
  -o /app/data/2.osm.pbf --overwrite \
  -s smart -S types=any

osmium merge /app/data/1.osm.pbf /app/data/2.osm.pbf \
  -o /app/data/composite.osm.pbf --overwrite
Importing the data: osm2pgsql
Osm2pgsql is an incredible tool for getting your OSM data into a relational database that other programs can work with. There’s more to it than we can cover in a single workshop, but we’ll cover the essentials to get you started.
Pros
- well established and actively maintained
- extremely configurable
- allows “mid-stream” geometry processing
- can export to different coordinate systems (with
projsupport) - lots of examples in the documentation
Cons
- Updating requires a replication URL, not easily limited to your AOI
- Steep learning curve for custom configuration
Default Output
To get the most common features and fields into your database, you can run the following command:
- Run
osm2pgsqlagainst your extract with the default settings. - Check out the default output in QGIS or pgAdmin. You should have four new tables:
You could work with that output, and even make some decent maps with it, but you’ll probably get tired of the proliferation of empty columns and filtering required to use it well.
The osm2pgsql maintainers strongly encourage taking the plunge and learning the flex output. So let’s do that!
Flex Output
This option uses a Lua file to define what features are imported, what fields / tags get included, and more. It’s a lot more involved! Let’s take a look at some examples.
Example: Traffic Roads
We’ll start with a simple, focused example: traffic roads. If you’re not familiar with OpenStreetMap tagging, that will be any way where the highway tag has any of the following:
- motorway
- trunk
- primary
- secondary
- tertiary
- unclassified
- residential
- service
The table
To begin, we need to define the table object. There are specific functions for different geometry types, but I like the generic define_table.
local roads = osm2pgsql.define_table({
  name = 'roads',
  ids = { type = 'any', type_column = 'osm_type', id_column = 'osm_id' },
  columns = {
    { column = 'name' },
    { column = 'class' },
    { column = 'maxspeed' },
    { column = 'oneway' },
    { column = 'geom', type = 'point', not_null = true }
  }
})
Column attributes
When you define your columns, there are a number of properties you can define.
- If a tag tends to have numeric data, you can try setting
typeandsql_typeaccordingly, to coerce the values to that type. - You can set
not_nullto require features to have a value in the field. - On geometry, you can set the geometry
typeandprojection.
Processing
Next, we process the objects in our data file. We call osm2pgsql.process_way(object), and anything we put inside this function will be used against everything in our input data.
process_node and process_relation for those types of elements.Within that function the object has a lot of fields and functions. Refer to the docs for the full list.
For us, all we really need is object.tags to look into a feature’s tags.
local highway_types = {
'motorway',
'motorway_link',
'trunk',
'trunk_link',
'primary',
'primary_link',
'secondary',
'secondary_link',
'tertiary',
'tertiary_link',
'unclassified',
'residential',
'track',
'service',
}
local types = {}
for _, k in ipairs(highway_types) do
types[k] = 1
end
function osm2pgsql.process_way(object)
if not types[object.tags.highway] then
return
end
roads.insert({
name = object.tags.name,
class = object.tags.highway,
maxspeed = object.tags.maxspeed,
oneway = object.tags.oneway,
geom = object:as_linestring()
})
end- 1
-
We define a list of
highwaytags we want. - 2
-
We build a
typesobject for later checking. - 3
- We perform the check on each object: is the type in our list?
- 4
- If yes: add the feature to the table!
If this table was all we wanted, then we’d be all set!
Run the import
import-roads.sh
In this example, the -O flex option tells the program what output type we’re using, and -S [filename] gives it the Lua file that defines the output.
Run an import of roads using the Lua script above. (Note that it’s split across two code blocks here, but the full file can be found [in the workshop])
Example: Points of Interest
Let’s say we want a table of any shop or amenity points.
Here’s where some familiarity with OSM comes in handy. Depending on the regional conventions or the individual mapper’s preferences, a “point” of interest like an amenity or a shop may actually be mapped as an area! So, what do we do?
Easy: we tell our function to handle things a little differently based on the geometry type. Here’s the code:
pois.lua
local pois = osm2pgsql.define_table({
name = 'pois',
ids = { type = 'any', type_column = 'osm_type', id_column = 'osm_id' },
columns = {
{ column = 'name' },
{ column = 'class', not_null = true },
{ column = 'subclass' },
{ column = 'geom', type = 'point', not_null = true },
},
indexes = {
{ column = { 'name' }, method = 'btree' },
{ column = { 'geom' }, method = 'gist' }
}
})
function process_poi(object, geom)
local a = {
name = object.tags.name,
geom = geom,
tags = object.tags
}
if object.tags.amenity then
a.class = 'amenity'
a.subclass = object.tags.amenity
elseif object.tags.shop then
a.class = 'shop'
a.subclass = object.tags.shop
else
return
end
pois:insert(a)
end
function osm2pgsql.process_node(object)
process_poi(object, object:as_point())
end
function osm2pgsql.process_way(object)
if object.is_closed then
process_poi(object, object:as_polygon():centroid())
end
end- 1
-
Our
process_poifunction, which takes an object and its geometry. - 2
- We process all our nodes, passing them directly into the poi function.
- 3
- For ways, we check: are they closed? This usually means an area. If so, take the centroid of the area and pass that into the poi function.
Indexes
osm2pgsql will automatically add an index to the geometry column, but we can also tell the program to create other indices for us. We won’t get into the weeds on database indexes, but if you anticipate searching through one of your field (name, address, that sort of thing), it’s not a bad idea.
Run the import
import-pois.sh
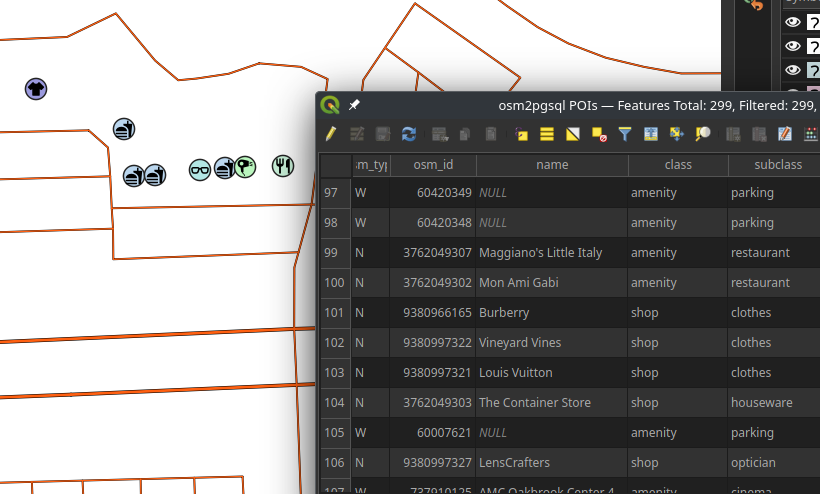
Note the osm_type column, which shows W for ways, and N for nodes. If we only took one or the other, we’d be missing out on a lot features! Now no matter how the features are mapped, we’ll get a nice little point feature in our database.
Run the POI import.
Example: Numbered Road Routes
One more basic example. We want numbered road routes in our map. In OpenStreetMap, these are mapped as relations.
Relations in OSM are all over the place, but each has:
- A type, such as a route or a boundary
- One to many members, being other nodes, ways, or relations
- Each member may or may not have a role
How a relation works, the kinds of members and roles you could expect, and what any of it means can totally vary by relation type. Routes are easy enough, though! Route relation members are simply the road segments that are part of the route.
The thing with routes being made up of road segments is that your single Route 1 might be represented by hundreds of separate features. And any of those features might also be part of other routes, too! You either end up duplicating multi-route segments, or you vastly complicate the data being stored on your roads.
The approach I like for this is to merge the members into a single multiline geometry, per route.
routes.lua
local ways = osm2pgsql.define_table({
name = 'routes',
ids = { type = 'way', id_column = 'osm_id' },
columns = {
{ column = 'id', sql_type = 'serial', create_only = true },
{ column = 'ref' },
{ column = 'name' },
{ column = 'network' },
{ column = 'geom', type = 'multilinestring', not_null = true}
}
})
function osm2pgsql.process_relation(object)
if object.tags.route == 'road' then
ways:insert({
tags = object.tags,
geom = object:as_multilinestring():line_merge(),
ref = object.tags.ref,
name = object.tags.name,
network = object.tags.network
})
end
end- 1
- Filter for road routes
- 2
- Merge all ways together
Run the import
import-routes.sh
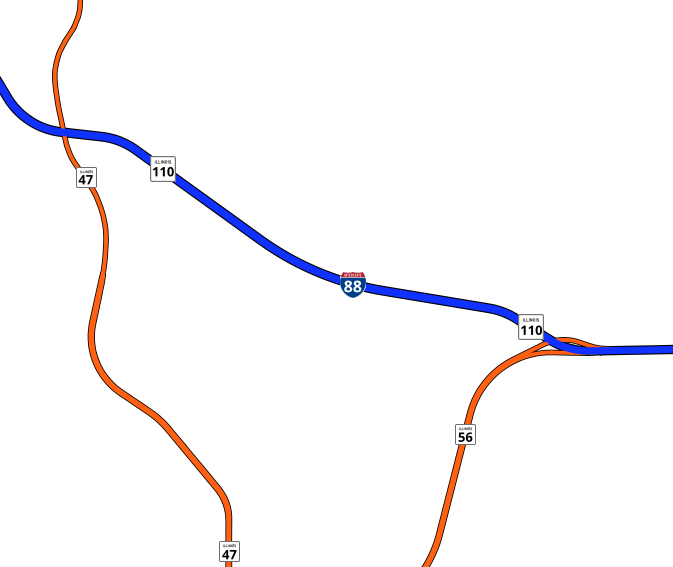
Import the road routes table.
Multiple Tables
Let’s take things up a notch. Rarely will you be going to all this trouble just to get a single table. Here’s a bigger Lua file that gets us everything we need to make a decent map of a park or forest preserve.
See the code
parks.lua
local parks = osm2pgsql.define_table({
    name = 'parks',
    ids = { type = 'any', type_column = 'osm_type', id_column = 'osm_id' },
    columns = {
        { column = 'name' },
        { column = 'type' },
        { column = 'operator' },
        { column = 'access' },
        { column = 'housenumber' },
        { column = 'street' },
        { column = 'city' },
        { column = 'postcode' },
        { column = 'geom', type = 'polygon', not_null = true }
    }
})

local trails = osm2pgsql.define_table({
    name = 'trails',
    ids = { type = 'any', type_column = 'osm_type', id_column = 'osm_id' },
    columns = {
        { column = 'access' },
        { column = 'type' },
        { column = 'name' },
        { column = 'foot' },
        { column = 'bicycle' },
        { column = 'horse' },
        { column = 'surface' },
        { column = 'geom', type = 'linestring', not_null = true }
    }
})

local natural = osm2pgsql.define_table({
    name = 'natural_areas',
    ids = { type = 'any', type_column = 'osm_type', id_column = 'osm_id' },
    columns = {
        { column = 'name' },
        { column = 'type' },
        { column = 'geom', type = 'polygon', not_null = true }
    }
})

local buildings = osm2pgsql.define_table({
    name = 'buildings',
    ids = { type = 'any', type_column = 'osm_type', id_column = 'osm_id' },
    columns = {
        { column = 'name' },
        { column = 'geom', type = 'polygon', not_null = true }
    }
})

local amenity_areas = osm2pgsql.define_table({
    name = 'amenity_areas',
    ids = { type = 'any', type_column = 'osm_type', id_column = 'osm_id' },
    columns = {
        { column = 'name' },
        { column = 'type' },
        { column = 'access' },
        { column = 'geom', type = 'polygon', not_null = true }
    }
})

local amenity_points = osm2pgsql.define_table({
    name = 'amenity_points',
    ids = { type = 'any', type_column = 'osm_type', id_column = 'osm_id' },
    columns = {
        { column = 'name' },
        { column = 'type' },
        { column = 'access' },
        { column = 'geom', type = 'point', not_null = true }
    }
})

local highway_types = {
    'path',
    'footway',
    'bridleway',
    'track',
    'cycleway'
}

local types = {}
for _, k in ipairs(highway_types) do
  types[k] = 1
end

function osm2pgsql.process_way(object)

    -- trails
    if types[object.tags.highway] then
        trails:insert({
            name = object.tags.name,
            type = object.tags.highway,
            access = object.tags.access,
            foot = object.tags.foot,
            bicycle = object.tags.bicycle,
            horse = object.tags.horse,
            surface = object.tags.surface,
            geom = object:as_linestring()
        })
    end

    -- parks and forest preserves
    if object.tags.leisure == 'nature_reserve' or object.tags.leisure == 'park' then
        parks:insert({
            name = object.tags.name,
            type = object.tags.leisure,
            operator = object.tags.operator,
            access = object.tags.access,
            housenumber = object.tags['addr:housenumber'],
            street = object.tags['addr:street'],
            city = object.tags['addr:city'],
            postcode = object.tags['addr:postcode'],
            geom = object:as_polygon()
        })
    -- amenity areas not caught by above
    elseif object.tags.amenity or object.tags.leisure then
        local a = {
            name = object.tags.name,
            access = object.tags.access,
            geom = object:as_polygon()
        }

        if object.tags.amenity then
            a.type = object.tags.amenity
        else
            a.type = object.tags.leisure
        end

        amenity_areas:insert(a)

        if object.is_closed then
            a.geom = object:as_polygon():centroid()
            amenity_points:insert(a)
        end

    end

    -- natural areas
    if object.tags.natural then
        natural:insert({
            name = object.tags.name,
            type = object.tags.natural,
            geom = object:as_polygon()
        })
    end

    -- buildings
    if object.tags.building then
        buildings:insert({
            name = object.tags.name,
            geom = object:as_polygon()
        })
    end

end

-- amenity points
function osm2pgsql.process_node(object)
    if object.tags.amenity or object.tags.leisure then
        local a = {
            name = object.tags.name,
            access = object.tags.access,
            geom = object:as_point()
        }

        if object.tags.amenity then
            a.type = object.tags.amenity
        else
            a.type = object.tags.leisure
        end

        amenity_points:insert(a)
    end
end
Run the import
import-parks.sh

Using the Lua file above as a starting point, or starting from scratch, import multiple tables.
For a quick guide to common OSM features and how they are tagged, check out the Map Features page of the OSM Wiki.
Catch-All with jsonb (or hstore)
Now we’re going to go in a completely different direction. One of my favorite things about OSM is the open-ended schema. Most anything you can think of can be mapped or tagged in some way, and I am constantly surprised by what I find in the data.
All the Features
Let’s take this even further. What if I don’t know which features I want to add? Maybe my map would look just perfect if I had waterslides as linear features, but I don’t have a line table to put them in. Now we’re not just adding new fields, but entire tables. Not the end of the world, and working with small extracts of OSM, imports go fast enough that re-running it is trivial.
But still, wouldn’t it be nice to have all the data at my fingertips? Let’s do it!
See the code
all.lua
local nodes = osm2pgsql.define_table({
    name = 'all_nodes',
    ids = { type = 'any', id_column = 'osm_id' },
    columns = {
        { column = 'id', sql_type = 'serial', create_only = true },
        { column = 'tags', type = 'jsonb' },
        { column = 'geom', type = 'point', not_null = true }
    }
})

local ways = osm2pgsql.define_table({
    name = 'all_ways',
    ids = { type = 'way', id_column = 'osm_id' },
    columns = {
        { column = 'id', sql_type = 'serial', create_only = true },
        { column = 'tags', type = 'jsonb' },
        { column = 'geom', type = 'multilinestring', not_null = true}
    }
})

local areas = osm2pgsql.define_table({
    name = 'all_areas',
    ids = { type = 'any', id_column = 'osm_id' },
    columns = {
        { column = 'id', sql_type = 'serial', create_only = true },
        { column = 'tags', type = 'jsonb' },
        { column = 'geom', type = 'multipolygon', not_null = true}
    }
})

function osm2pgsql.process_node(object)
    nodes:insert({
        tags = object.tags,
        geom = object:as_point()
    })
end

function osm2pgsql.process_way(object)
    if object.is_closed then
        areas:insert({
            tags = object.tags,
            geom = object:as_polygon()
        })

        -- get centroid of any closed way
        nodes:insert({
            tags = object.tags,
            geom = object:as_polygon():centroid()
        })
    end

    ways:insert({
        tags = object.tags,
        geom = object:as_linestring()
    })
end


function osm2pgsql.process_relation(object)
    if object.tags.type == 'route' or object.tags.type == 'waterway' then
        ways:insert({
            tags = object.tags,
            geom = object:as_multilinestring():line_merge()
        })
    end

    if object.tags.type == 'multipolygon' or object.tags.type == 'boundary' then
        areas:insert({
            tags = object.tags,
            geom = object:as_multipolygon()
        })
    end
end
Run the import
import-all.sh
Import EVERYTHING.
My example only included road route, waterway, and boundary relations. Add some other types to the mix.
Okay, cool, but… how are you supposed to use this? We’ll get to that later.
Using the Data: Other Programs
Before we play with the data in QGIS, we should mention a few other ways you can use your cool new database full of stuff.
If you’re using the compose file from the workshop repo, these other tools are included.
Serving Vector Tiles on the Fly
PostGIS has a really great function, ST_AsMVT, which returns the response of your query as a series of vector tiles. Here are a couple of tools that build onto this capability.
Martin
Martin is a tile server able to generate and serve vector tiles on the fly from large PostGIS databases, PMTiles (local or remote), and MBTiles files, allowing multiple tile sources to be dynamically combined into one. Martin optimizes for speed and heavy traffic, and is written in Rust.
Composite sources are fun, you can basically pull every table you’ve got into a single vector tile “service”. Can work with file-based vector tiles as well as a database.
pg_tileserv
A PostGIS-only tile server in Go. Strip away all the other requirements, it just has to take in HTTP tile requests and form and execute SQL. In a sincere act of flattery, the API looks a lot like that of the Martin tile server.
Personally, I really like the built-in catalog. It’s otherwise very similar to Martin.
Serving Features
There’s a lot you can do with vector tiles these days, and you may never need to serve “real” features to your users. But if you did, there are lots of ways to do it. Basically any enterprise GIS system (Esri stuff, GeoServer, etc.,) can connect to a PostGIS database.
Since we’re already adjacent to it, looking at pg_tileserve, I did want to specifically mention one tool:
pg_featureserv
Similarly lightweight and straightforward. If all you need is to make your feature services available via a REST endpoint, it’s worth your time to check it out.
Using the Data: Desktop GIS
QGIS
Connecting to the Database
In the Browser panel, right-click on the PostgreSQL section and create a new connection. You can also add a connection from the Data Source Manager.

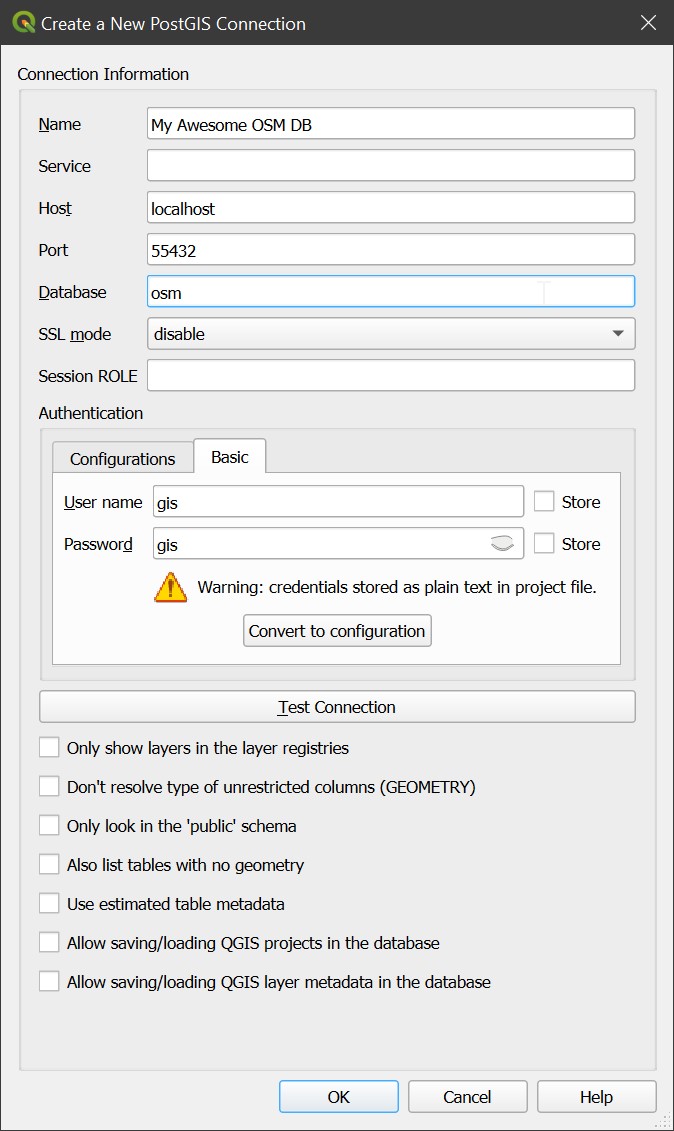
Connect QGIS to your PostGIS Database!
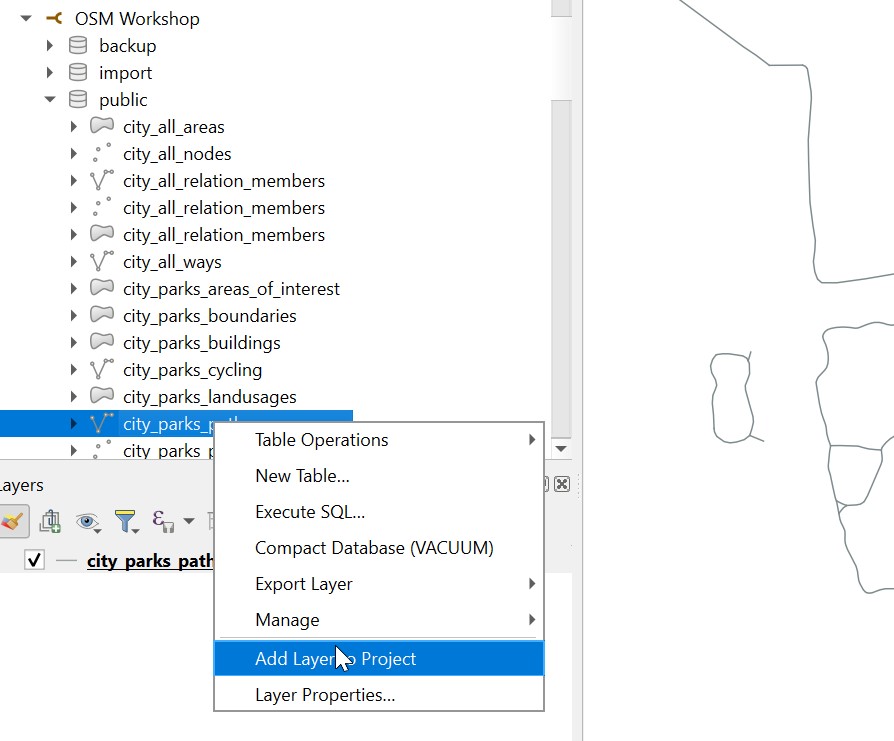
You should see your imported tables in the public schema. (That is, if you didn’t specify some other schema in your imports!)
Add a Layer Directly
If your config is already pretty detailed and split into specific tables, you can open up the table list in the Browser Panel and add any layer to your project by right-clicking or just dragging and dropping.
Creating a Query Layer
Right-click the database connection and choose Execute SQL. In the window that opens, write any valid SQL expression that returns a unique ID and geometry, and you can choose to load it as a layer.
Using hstore and jsonb columns directly with map_get
In QGIS, we can actually add our tags field straight to the layer itself, and we will still be able to work with it.
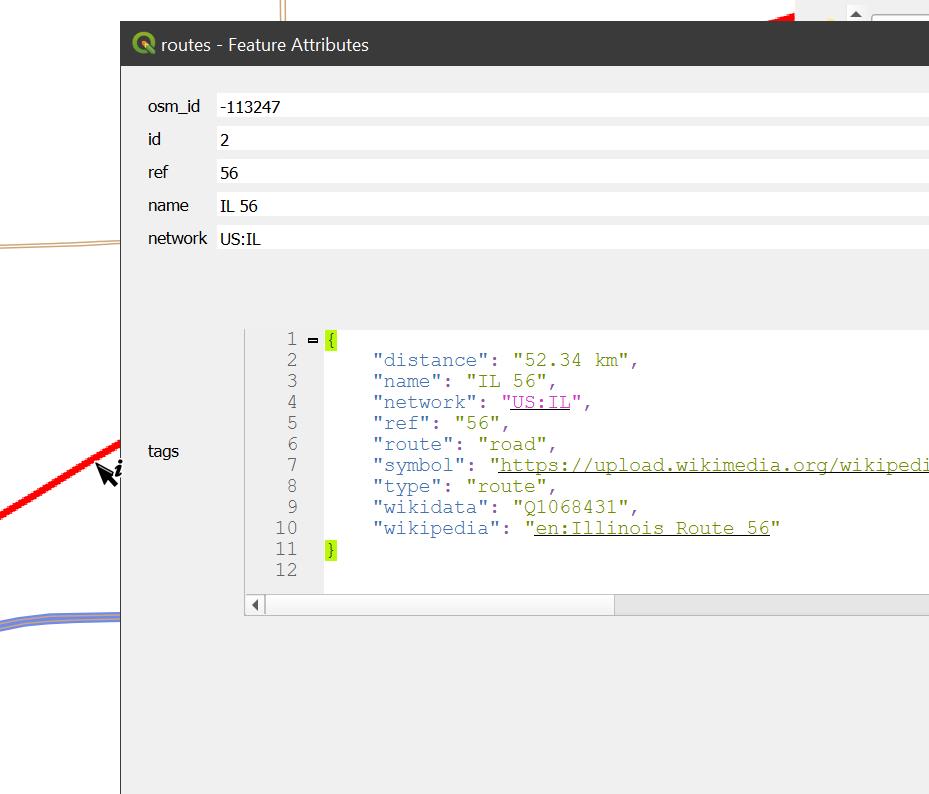
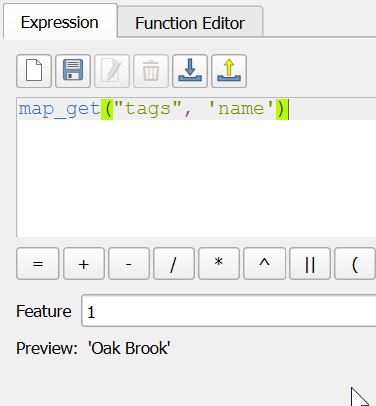
In order to pull out a specific tag from this outside of SQL, QGIS’s expression editor has the function map_get. The “map” in map_get refers to what in other languages is a dictionary.
You can see in the Preview that a name is being pulled from the “tags” column, even though in the example pictured, that tag was not queried to its own column.
Overusing map_get isn’t going to perform quite as well as writing the query layer to include those tags, but it’s another way in which the data can remain extremely flexible as you work with it.
Add one of your layers that has a tags column to the map. Use map_get to pull an attribute into a labeling expression.
Writing Queries w/ hstore and jsonb
When querying a “catch-all” column, the SQL is very simple. Just use -> for hstore and ->> for jsonb.
To be clear, the single arrow will work for jsonb as well, but that will return "some text" complete with the quotation marks, which is not usually what we want.
Sample Queries
Buildings
Landuse
With a PostGIS DB, you have full access to a number of spatial SQL functions. This can be especially useful for putting certain spatial analysis steps into the query itself, avoiding static intermediate outputs.
Fifty Feet From a Bathroom
The sky’s the limit! This isn’t a spatial SQL workshop, but try things like:
- Intersecting two layers
- Checking for features within a certain distance using
ST_DWithin - Aggregating attributes from nearby features
- Clipping features to a political boundary
ArcGIS Pro
I know, it’s not FOSS, but it’s worth mentioning, in case you or someone you know wants to use OSM data and they’re working in Pro.
Just add a query layer and use the same SQL as before.
ArcGIS Pro does not like hstore or jsonb columns, and won’t know what to do if you try to bring it in as-is. You will need to use the ->> accessor to grab any specific tags you’re looking for.
Okay, but what am I using these layers for?
Once the layers are in your map, whether they are carefully defined in your import config or simply a SQL query, they can be used for anything that any other layer can be used for in Q or in ArcGIS. Probably. I haven’t tested all use cases yet. But here are a few that I have:
- Publish to AGOL / Portal as a Hosted Feature Layer or Map Service
- Use as GeoProcessing input
- Build a street / address / point of interest locator
- Use to create vector tiles
- Just make really nice print maps
Including Metadata
You may not need the full metadata of OSM objects, but it can often be useful for quality control and validation purposes. “Metadata” refers to information like what version an object is, the user who last edited it, and what changeset was responsible. Full-metadata extracts are available from Geofabrik.
At Kendall County, we do just that. You can find our process in this repository, and you can make any changes you like to adapt it to your particular needs.
Per the Geofabrik website:
[Full metadata extract file] usage is governed by data protection regulations in the European Union. These regulations apply even to data processing that happens outside the European Union because some people whose data is contained in this files live in the European Union. These files may only be used for OpenStreetMap interal purposes, e.g. quality assurance. You must ensure that derived databases and works based on these files are only accessible to OpenStreetMap contributors.
A Final Note
Whatever you do with your data, please, please, please:
Don’t forget the attribution!